Saturday, July 5, 2014

Coarse - #47-49: the bone garden necklaces

All three of these necklaces include some bit of an animal.  I am currently finding inspiration from the idea of mixing bones with other material, such as metal or wood.

The first two necklaces are similar and both consist of a piece of an Alaskan caribou antler which has been brushed with a sealer, wrapped in wire and then attached to an imitation suede thong, which has a toggle closure.


The third necklace was exciting for me to make and I am calling it the "butterfly, birch, bead and bone" necklace.  All I knew was that I wanted to have mismatched natural elements mixed with things like beads and metal.
The bone piece is an Alaskan muskrat jawbone and the circle of birch is real.  I also strung a few beads together, glued a butterfly in place, and attached a beautiful floral toggle closure (thanks Molly!).


Recast - #46: the custom cork necklace

This is a new necklace and a version that was based on #42 which had been requested with custom specific design elements.  Changes made included the necklace going from a bead chain to a brown leather thong as well as the addition of a toggle closure.  For the toggle, I found that a fossilized walrus tooth worked well to fill certain design requests.  I loved the results and this version of the design has inspired some other necklaces in the works.


Support - #45: the patella dream catcher

I am actually sad to be wrapping up attending physical therapy for the last six months for a knee injury.  Had some good conversations and laughs there and successfully worked hard to avoid surgery.  So I wanted to make a unique goodbye / remembrance gift for my physical therapist.  My injury was patella-related so I figured it would be a good place to start.

I gathered all pictures and text related to the patella from my various biology and medical terminology books as well as some barbie legs for good measure.


As I was playing around with different layout ideas, I remembered that I had a large wooden ring that came with some other hoops in an embroidery grab bag from a thrift store, and that I wanted to use it in something I made.  Once I placed the graphics in the circle, it seemed to flow that the legs would be attached and then it started to look like a dream catcher to me.  All items were placed on top of a stock paper design.


Using a brush to mod-podge this type of layout is pretty much impossible.  So I used a spray adhesive, which I actually really don't like doing, to give the paper the first layer it needed to remain in place for the more thorough brushed layer.  A cut cardboard circle was used as backing and in between the layers I taped the green jute attached to the legs and for the hanging loop.  All was sealed with mod-podge.


I can't wait to see his face.

Thursday, July 3, 2014

Lóbrega - #44: the torso box

This was a dark, mixed media piece which I enjoyed putting together.  The box was a thrift store find made of cheap rough wood which I wanted to transform into a display of a figure and a feeling.

The box in the beginning...


As I mentioned in a previous post, I am incorporating paint washes where I can because I love the effect they bring to the wood.  For this wash, I decided to mix paint that was black, white, and dark purple, plus the water.


The technique and color choices had better results than I had hoped, though the camera doesn't do the color justice.  I think it takes seeing it in person to truly appreciate things like the subtle purple tint and the grain highlight. 


Once that was completed, I began to work on the inside.  First, the inner sides and bottom were decoupaged with stock paper and a small glass charm was hung with a tack onto one of the side walls.


I then went about preparing the paper mache torso which would be the centerpiece of the box by adding stamps and metal pieces.


It was then time to put it all together and finish with the final touches on the lid.  For the front of the lid, I decoupaged a print of Francisco Goya's, The sleep of reason brings forth monsters, as well as secured a beautiful black and white owl knob that was a great find at a local store.  The inside of the lid was color blocked with black and white paint, onto which I then decoupaged a print of José Posada's, La Catrina.  Finally, I glued the lid into a position that would have the box remain open.

Results:


Latch - #42-43: the cork necklaces

I have been working on a number of pieces recently which have required down time for drying, etc.  During those in-between times, I started just messing around with some jewelry elements and recycled wine bottle corks.  Because it was spontaneous work I don't have the usual round of mock up pictures or story line.  So this is a much more simple post in that all I really have are the results pictures.

There were a bunch of newly oxidized washers on hand which I had in mind to use as a top and bottom frame for a cork necklace.  I wanted to layer them by size and use an eye screw on top for the chain and a regular black screw on the bottom.


And I have no explanations for this one except that lint catchers make good barbie hats and that her head is over a large eye screw.


Wednesday, July 2, 2014

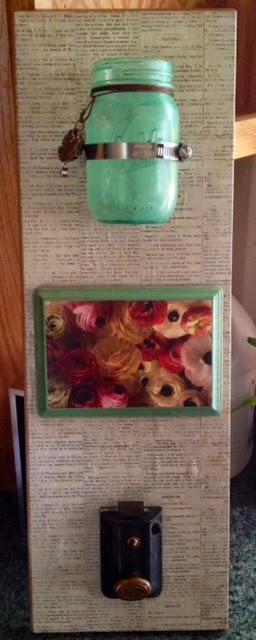
Jazz - #41: the functional wall hanging

I have wanted to make something functional like this for a while and it involved a lot of small steps for it all to come together - and I love the results!

I started with a thrift store 24" x 8" shelf and some additional elements I knew I wanted to incorporate - smaller rectangle of craft wood, a ring clamp, an old thrift store door lock with knob, and a mason jar.


Another round of oxidation was called for and I threw in all of the ring clamps I had on hand as well as another batch of washers which I use for jewelry and other projects.


While those were cooking, I made up a wash for the smaller craft wood and the mason jar. I am becoming somewhat obsessed with washes - just acrylic paint with added water - because I love how they bring out the grain and texture of the wood or glass without completely saturating with paint.  And there are all sorts of ways to vary this effect.  I will be using washes in a lot of upcoming pieces. 


Then it was time to paint the jar and the smaller piece of wood and decoupage some stock paper onto the main shelf and then the small wood once the paint was dry.  After that, it was just a matter of assembling everything.  Results:


I had this in mind for a bathroom where the the knob can be used as a towel holder and the jar could hold toothbrushes or flowers or whatever.  But it would be perfectly fine elsewhere.